If you’re not making YouTube content for your small business, it’s time to start.
Video is already huge, and it’s going to get bigger soon.
You can’t just make any content, though.
Your goal is to make video that captures attention.
Unless your plan is to be a YouTube celebrity, you’ve got to make content that suits your company.
That means making things a little more professional.
You know, have a little style.
YouTube Content For Small Business Is All About Getting The Message Across
Video content can be a gamechanger for your small business.
However, you’ve got to understand what the goal of any video you make is.
You’re not trying to impress your audience with a flashy video or make a Hollywood blockbuster.
If you come at it from that angle, you’re going to frustrate yourself with a ton of work, a steep learning curve, and results that won’t be worth it.
Make the video that fits your goals. Share on XSmall business YouTube content is about educating your audience on the nuances of your industry.
While there are a ton of potential ways to do that, none of them include special effects or action sequences.
Remember to keep your videos straightforward and focus on delivering your message in the most effective way possible.
Effective YouTube Content Takes A Professional Style
If you want professional YouTube content, you need to know what to do.
There are some simple things that will improve the quality of your videos.
With a little effort and investment, you can make high-quality YouTube content that your target audience will enjoy watching.
If they enjoy it, they’ll stick with it longer.
That’s going to help build the trust and familiarity you’re looking for in all your content marketing.
Let’s go over those tips so you can make the best YouTube content possible.
Plan Your Video In Advance
If you don’t have a plan for your YouTube content, it’s going to show.
Poor planning will always result in an amateurish video that won’t get the kind of attention you’re looking for.
Recording without a plan is lazy.
Planning your video is simple and helps make sure the content within it holds value for your audience.
Figure out what you’re trying to communicate through this video.
From there, decide the best way to share that message with your intended audience.
That’s going to set you up to write an effective script.
Then you can plan your video shots with a storyboard.
If needed, don’t hesitate to swap sections, rewrite content, or get rid of portions to make sure your video stays consistent.
If it doesn’t work, change it.
Above all, make sure you’re getting to the point and avoiding unnecessary, unhelpful content.
Get The Lighting Right
In case you hadn’t figured it out, video is a visual medium.
It has to look good to work.
If your lighting sucks, your video does too.
That’s why this has to be a priority.
With too little or improperly placed light, the best video can look like crap.
If you have access to large windows or an outdoor venue, the natural light available makes the best sources.
However, you want to avoid filming during the parts of the day where the light is most direct.
Natural diffusion, especially from a lightly overcast day, a sunrise, or a late-afternoon angle make the best times to shoot.
That noontime sun can put a dark shadow in some of the most critical places, especially across the eyes.
If your location is using artificial light, you need to check your placement and filters.
Try to avoid relying on ceiling lamps or other overhead lighting.
You’ll get the same problem from them that you do from midday lighting.
Light that points directly at the subject is great, unless you only have one light source.
When you’re working with a single source, try to place it so you have as few background shadows as possible.
They call those single-sources “hard light”, and the shadows they cast might not be the best for a professional video.
However, they’re great for something more dramatic.
Instead, do your best to create a “flat light” look, using multiple light sources and a bit of diffusion.
A white sheet or pillowcase between the light and your subject create this effect well.
Try to light up the whole face of your subject, as that’s what you want your audience focused on.
Placing lights on either side of the camera help eliminate background shadows.
You can also place a light out of the camera’s line of sight between your subject and the backdrop to help eliminate more.
Make Your Audio Sparkle
The biggest mistake you could make with your video is undervaluing your audio.
If you’re making informational videos, it’s the things you say that matter.
While you want your video to look as good as possible, you want it to sound far better.
Think about it: if you can’t hear or understand what they’re saying in a video, you don’t watch it.
Neither does anyone else.
Bad audio makes the video bad. Share on XThat makes your microphone the most valuable piece of equipment you should invest in.
Don’t take this investment lightly.
While there are tons of expensive options out there, they may not suit your needs.
But don’t go for the least expensive one either.
Look at the purpose of different types of microphones.
See how a boom mic differs from a shotgun mic and a lavalier mic.
Once you’ve read up, figure out which works best for your needs.
After you’ve got the right mic, determine the best way to get it close to your subject.
The closer the better.
Add a pop filter to keep out those little noises that come from breaths or the letter “p”.
Make sure you’re super aware of the background noises in your shot.
The airplanes overhead may not sound that loud, but they’re probably overwhelming your audio track.
Simplify The Backdrop
Backgrounds matter in your video more than you can imagine.
As you decide what’s going to make up the backdrop you’re working with, there are two things to think about.
- Does this fit my brand?
- Is this going to distract my audience?
Some content creators have no problem using a background with a lot going on in it.
Like Gary Vaynerchuck.
It suits who they are and the way they make video.
And, though their backgrounds may seem cluttered, they’re careful to make sure it isn’t a distraction.
With that in mind, can you do the same?
The simplest thing to do is resort to a solid color background.
Hanging a cloth, bedsheet, or large piece of paper behind you as you speak is one of the best ways to assure your background is clean and distraction-free.
Empty walls can do the same.
In my videos, I record in front of a green screen, then remove it so I have as pure-white a backdrop as possible.
That also leaves me room for effects, images, and text when I edit.
Whatever you do, make sure it suits your brand’s style.
If you opt to include your office or a garden (or any other common backgrounds) in your video, make sure you adjust the focus to blur it just a little.
That helps remove some of the distraction potential.
Keep your background free of windows, mirrors, or other reflective surfaces.
Nothing looks less professional that catching the camera in the shot.
Also, a window in the background could create back-lighting.
That’s going to make it more difficult to see the subject on camera by casting shadows that will be tough for the cameral to counter.
Keep Your Camera Position Spot-On
This is for those of you who will be making your video content on your phone.
Phones are a great way to make videos.
The quality of most rear-facing cameras is great for video.
Which is why you need to use it instead of the selfie cam.
It’s rare that your front-facing camera will have the same level of quality as your rear-facing one.
Also, don’t hold your phone vertically.

Computer and television screens are horizontal – wider than they are tall.
You need to hold your phone in landscape mode to match.
When you do, your video content will look great on all screens.
If you’ve ever watched a vertically-shot video on YouTube, you know what I mean.
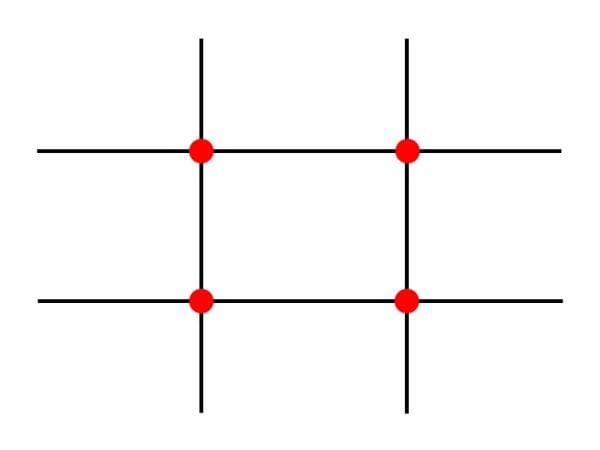
Turn on the photo grid overlay when using your phone camera, too.
This gives you a frame of reference for holding your phone level.
In many cases, it’s going to help you position your subject in the best spot on the video, too.
Work The Angles
The same, single, straight-shot video gets less and less interesting with every minute that passes.
To fix that, change angles when filming.
It’s going to apply more to a video that shows off a product or how to do something, but it can apply to videos where the subject is talking, too.
Move your camera position around the subject for different shots.
If you can, get more than one angle of the same sequence.
The more you shoot, the more options you have when editing the final product.
Grab a ton of B-roll footage, too.
That’s going to be something you can go back to for future projects.
Whenever you change the angle, it’s best to move at least 45 degrees.
Anything smaller doesn’t create a great effect.
Instead it just looks out of place and breaks the viewer’s experience.
Offset Your Shot
Ever heard of the rule of thirds?
It’s a film-school basic technique that sets the video’s subject off-center.
Picture your shooting field divided into thirds both vertically and horizontally.
You’ve now got a grid with 9 cells.

Those lines along those cells should align with the subject you’re shooting.
Even better if the main focal point exists where two lines intersect.
That will draw attention to the subject while offering greater depth to the video.
The rule of thirds isn’t mandatory.
In fact, you ought to vary your shots as you improve.
However, when you’re still learning what works in your video content, it’s better to stick to it often.
But once you learn where the shot should fall, you’ll know the best times to vary the focus.
Minimize The Shakes
Ever watched a video where the camera wasn’t still?
Usually on a home movie, but never in a professional production.
They even add shaky footage to films to make “found footage” films because it makes them look more amateur.
Your professional videos can’t have it.
Especially if you don’t want to make your audience seasick.
Don’t rely on your hands and arms to keep the camera steady.
It’s almost impossible to keep a camera still in your hands. Share on XUse a tripod.
Normally I’d suggest an alternate method to use if you don’t have a tripod, but you can pick up a tripod for $15.
The only reason you shouldn’t use a tripod is because you have something that works better.
Get your camera set up and stabilized, then don’t move it during the shot.
Panning the camera doesn’t make it more professional.
A pan effect can help in certain artistic situations or when you’re trying to convey action, but they don’t do much for a sequence without action.
If you’ve got to change angles (as suggested above), do it during a cut.
That’s also going to make your cuts look better.
If it still feels a little shaky, apply stabilization in editing.
In most cases, that’s going to handle any residual movement.
Don’t Over Edit
Once the video is shot, it’s time to edit.
It might be tempting to add all kinds of transitions and effects.
Don’t.
Keep the editing simple.
If you’re using a green screen, chroma-key it out.
Clean up the color if it’s off.
Tidy the background noise with audio editing.
Make the right cuts to get rid of those weird pauses.
If it’s appropriate, add in background music and transitions.
The idea is to have a final output that’s clean, simple, and keeps the focus on the content.
Try to make any scene changes happen with motion in both segments.
If you can’t, learn some good transition effects to make those boring jumps more interesting.
Add personality without detracting from the message.
Stick To The Basics For Great YouTube Content
Remember that your YouTube content is about educating your audience.
Don’t spend so much time trying to make better videos that you lose track of that.
Yes, video content takes time to plan, record, edit, and clean.
However, if your output is the kind of quality and value that keeps your audience engaged, it’s worth it.
Focus on keeping your videos clean and your final output simple and your audience will grow.
That will eventually lead to more leads, more sales, more revenue, and more growth.
And that’s what we’re all looking for.


